A good video creation tool is a must in every teacher’s toolbox. But what’s the best editor or program to use? This question has plagued me for a long time. I’m no expert but I’ve been making videos for years and have tried out a lot of different tools — offline software, online tools, and apps.
I’m always looking for a tool that’s the perfect mix of easy to use and feature rich. Sometimes it’s easier than it sounds!
You might have the same dilemma if you’re wanting to make a teaching video, graduation video, tutorial, end of year video, photo montage, or any other sort of video to mark a special occasion or milestone. There is so much that students can do with video creation too: demonstrate their learning, make tutorials, express their creativity and more.
This post offers you an overview of some tools you might want to consider for your next video production. I share my favourite video editors and offer you advice on choosing the best tool for your next project. I also share my top 5 tips to make your videos instantly better if you’re filming on your mobile device.
Note: These are all my own opinions and I have no affiliations with any of these brands. Let me know about your favourite video tools in a comment!

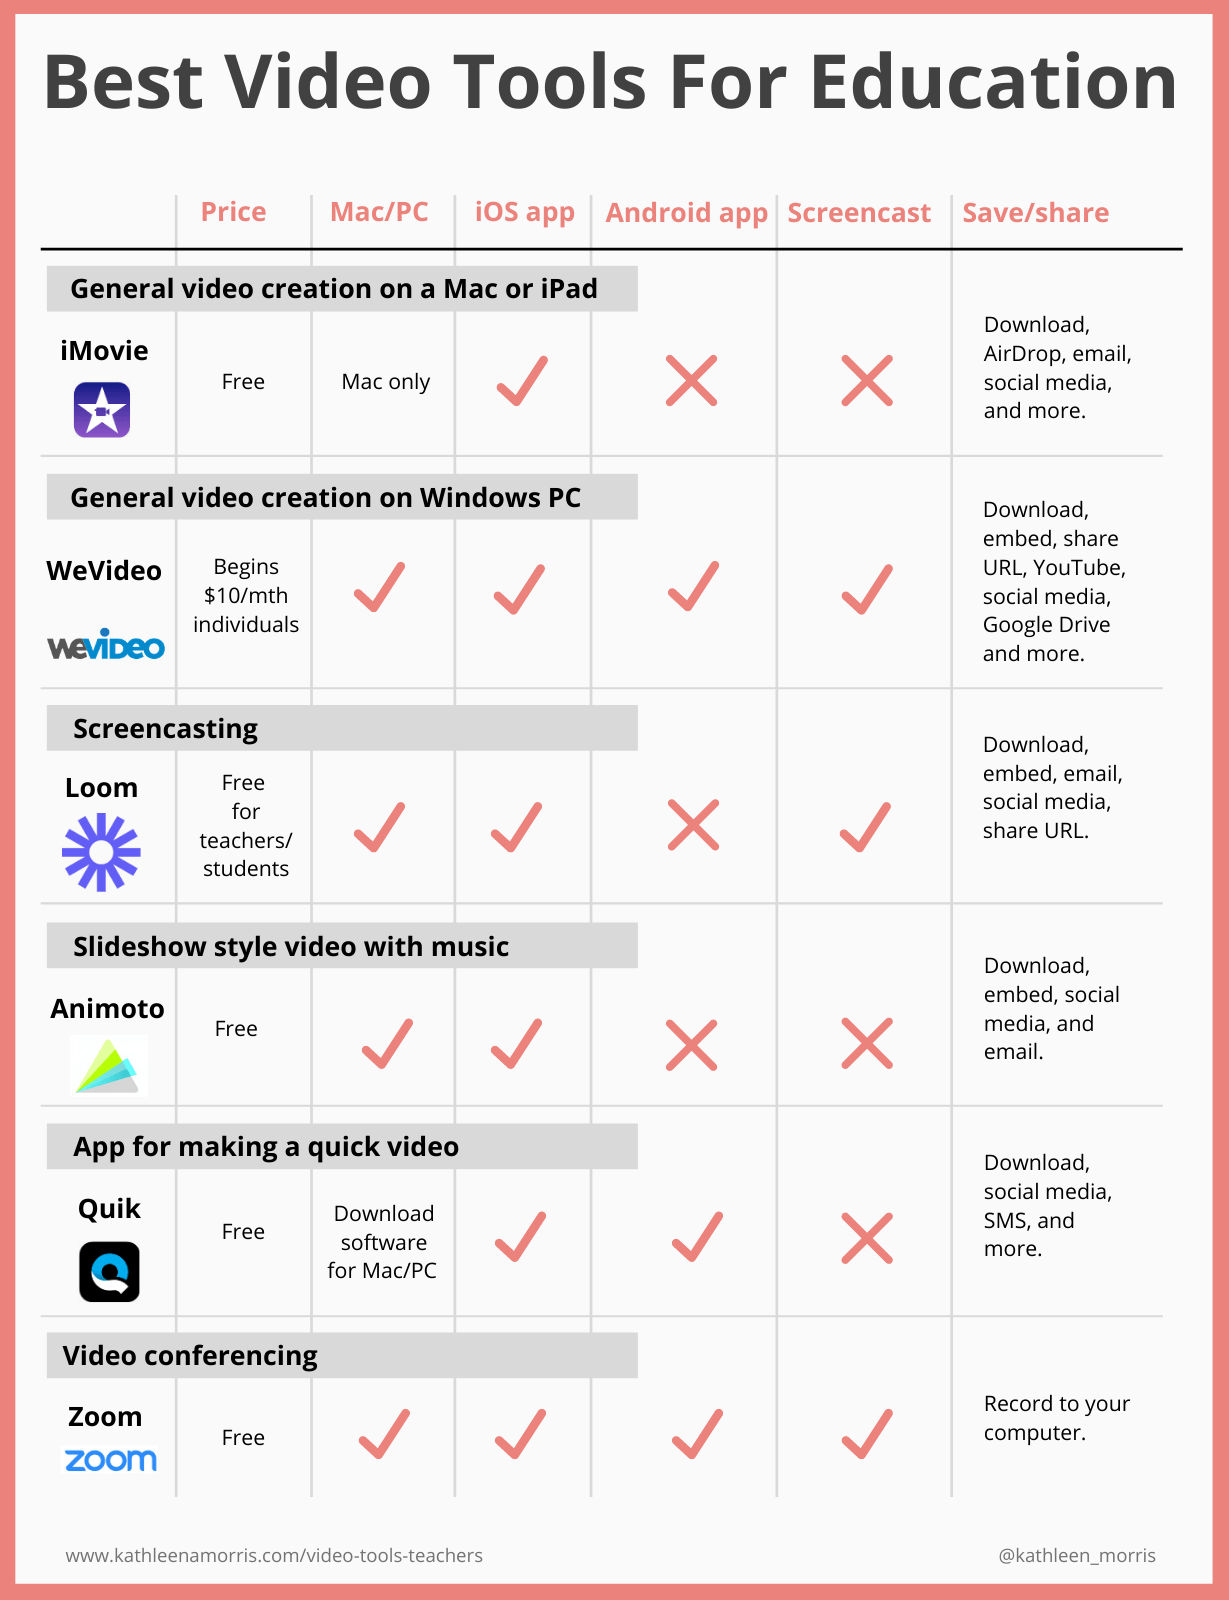
The Verdict: Best Video Tools for Teachers and Students
Don’t want to read through the post to get to the answers? Here’s the lowdown. You can read on to find out more about each of these tools and other options that are available.
My favourite video creation tools are:
- General video creation on a Mac or iPad: iMovie
- General video creation on a Windows computer: WeVideo (BUT it isn’t free)
- Screencasting: Loom
- Slideshow style video with music: Animoto
- App for making a quick video: Quik
- Tool for video conferencing: Zoom
Best Tools for General Video Creation: iMovie or WeVideo
If you’re looking to make a general video that’s a mix of video footage, narration, photos, and/or music, there are a lot of editors to choose from!
I have two favourite tools to recommend: iMovie for Mac Computers or iPad OR WeVideo for Windows computers. They’re both solid programs that are easy enough to learn and they both have a good range of features.
Let’s take a look at both of these options for general video creation.
iMovie
URL: iOS app | macOS
Use on: iPhone, iPad, or Mac computer
![]()
If you have a Mac computer or iPad, you’d know that iMovie is a free and robust tool for video creation. I think this is the go-to if you’re happy working on a iPad or Mac computer. I would use it more often but I don’t have a Mac computer. And unless I’m making a very short video, I prefer not to use a phone or tablet.
iMovie allows you to create anything from a short video slideshow to an impressive full-length movie.
There are optional templates to use and basically you just add your own photos, videos, titles, and music to a timeline to put your video together.
iMovie Pros
- The biggest pro of iMovie is that it is an excellent tool and it’s free.
- There are special effects available including the ability to slow down or speed up footage, as well as picture-in-picture and greenscreen.
- If you don’t have your own music to add to the video, iMovie offers 80+ soundtracks and there is also the option to add your own voice-over narration.
- If you have both a Mac and an iPad/iPhone, you can switch between devices to work on your projects.
iMovie Cons
- The main issue is you can’t use iMovie on a Windows computer.
- You can’t embed a completed iMovie video directly. You have to upload it somewhere first (like to YouTube) to embed it on your site or share a public link.
WeVideo
URL: https://www.wevideo.com
Use on: web| iOS | Android | Chromebook
![]()
The popularity of WeVideo has exploded in the edtech world recently. Whenever a question is asked on Twitter or in an education Facebook group about video creation, WeVideo is sure to rank highly in the recommendations.
I’ve spent many hours working on projects on WeVideo lately and I love it! It basically feels like the video creation tool I always wanted for my Windows computer: easy enough to use but not so easy that it’s lacking in features.
WeVideo Summary:
- Can be used on a computer or via the app. Personally, I find it much easier to make a video on a computer unless it’s a really short and simple project.
- You can record screen and webcam together (screencasting). Note: This isn’t available on the most basic plan.
- There are advanced features like greenscreen, slow motion, and picture in picture.
- You can download your finished video to your computer, embed it, share a link, or share to social media or other accounts.
WeVideo Pros:
- No software to download. You use it on the web and if you sign in on different devices, your work is right there waiting for you. This is great if teachers and students are using different devices at home and school.
- Inbuilt titles, music, and even graphics that are free to use.
- There is lots of support available. I used to use Adobe Premiere Elements and something that drove me crazy was the difficulty in finding help and support! WeVideo has clear help guides and you can also reach out to them with additional questions (I found them helpful via Twitter DM).
- If you like video tutorials, there are a lot available. If you’re like me and prefer to quickly read tutorials, then you’re covered as well.
- You don’t need to be an expert to use WeVideo; you can just use the basic tools if you’re new to video editing or try out more advanced features if you’re experienced.
- You can share your finished video by embedding it or sharing a direct link. This means you don’t have to upload your video to Google Drive or YouTube to share.
- Even though I don’t love creating videos on my phone, I use the WeVideo app on my phone to upload my footage (via Media Uploader). It’s then available to me when working on my computer.
WeVideo Cons:
- Cost! I love free tools but this is one you really need to pay for. I know for some, cost is a huge barrier, however, I also know many schools and districts are paying for WeVideo as they can see the benefits of this robust tool.
- There is a free plan but you can only create 5 minutes of footage per month, it includes WeVideo branding, and most features are missing.
- Full featured WeVideo has been free for schools affected by COVID-19 but that offer is no longer available (existing upgrades expire June 30, 2020).
- A single classroom account with up to 30 users is $299/year.
- Individual accounts start at $4.99/month (if paid annually) and allow you to publish up to 30 minutes of content a month.
- If you’re an advanced video editor you might find some features are missing, but honestly I think there is enough to create a really professional video. WeVideo also seems to get new features added progressively.
- It’d be good if you could import your footage from Google Photos (you can import from Google Drive and other places but not Google Photos yet).
Here’s a summary of the WeVideo features that come with education accounts.

What’s the Best Free Video Editor for Windows?
If you’re working on Windows and have a budget or your school is willing to pay, WeVideo may be the answer for you. However, if you’re looking for a Windows tool that’s totally free, it’s a bit trickier.
I know some people still use Windows Movie Maker and I enjoyed that program back in the day but it was discontinued years ago. Movie Maker was replaced with the Windows Video Editor app (if you’re on a Windows computer, you should be able to find it by typing it into the search bar).
Windows Video Editor is okay but it is very basic. If you’re new to video editing or you’re using it with young children, this program may be all you need but you might need to look elsewhere when you need additional features.
What would your choice be for a free classic video editor that you can use on a Windows computer? Tell me in a comment!
Best Free Tool for Screencasting: Loom
URL: https://www.loom.com
Use on: Chrome extension | Desktop app | iOS app
![]()
Screencasting is where you narrate a video recording of your computer screen. Sometimes it’s just audio and sometimes you can see your face in the video as well. Screencasts are great for making tutorials and have become indispensable for many teachers during remote learning.
My favourite free tool for screencasting is Loom.
I’ve written a blog post specifically about Loom if you want to learn what it’s all about and how teachers and students can use screencasting in the classroom. There are no age restrictions so students can use Loom if you want them to make screencasts.
In March 2020, Loom made their Pro Education version free forever for all verified teachers and students. You can record an unlimited number of 45 minute videos.
Honorable mention for a free screencasting tool: Screencastify
Screencastify is a very versatile option if you’re using a computer, however, the main limitation is you can only record for 5 minutes with a free plan. I do appreciate the power of brevity though!
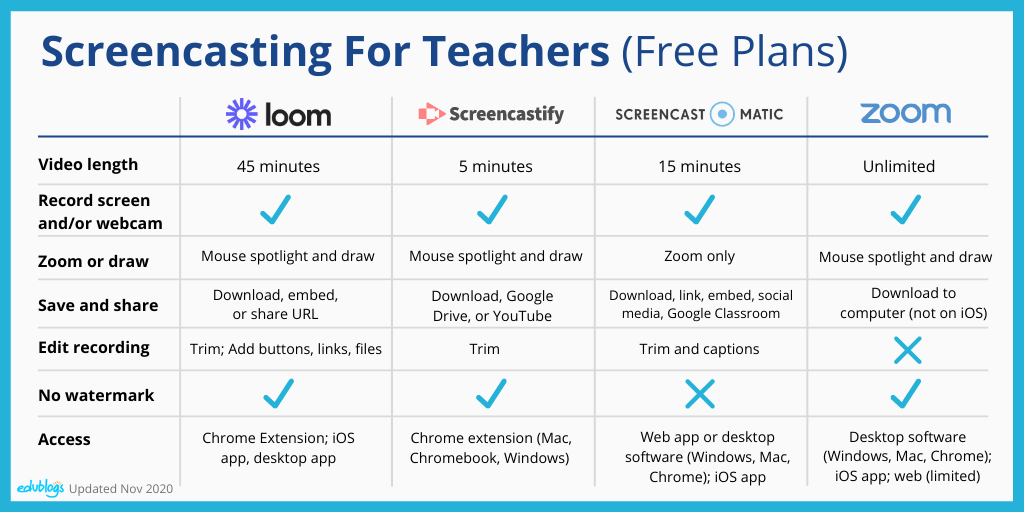
Comparison of free screencasting tools for educators
Below is a comparison chart of the features of some popular screencasting tools that I created for a post on The Edublogger. The chart compares the features of the free plans (paid plans have more features). The tools compared are:
Note: To record a screencast using Zoom, you start a meeting with yourself as the only participant and record the conference. You can’t record if you’re using the Zoom iOS app.
Best Tool for Making a Slideshow Style Video With Music: Animoto
URL: https://animoto.com
Use on: The web or iOS app (The Android app has been discontinued)

A question that often comes up in education circles is, “how can I make a slideshow style video or photo montage with music?”. This is a popular style of video especially when it’s coming up to graduation or the end of the year, or perhaps to celebrate a special milestone.
This was a hard category to choose but one of my favourites is Animoto (of course if you’re an iMovie or WeVideo user, these are excellent options).
The reasons Animoto is worth looking at for a slideshow style video with music are:
- It’s free for standard accounts (no real restrictions except there is Animoto branding on the video).
- It’s quick and easy to use — you add you photos and/or video clips and Animoto puts the slideshow together “automagically” (you can then tweak the video with different colours, fonts, music and more).
- You can set up unlimited student accounts so your students can create too. There’s different advice on how to do this depending on your students’ age. Find the steps to setting up student accounts here.
- You have the flexibility of creating on a computer or on your mobile device.
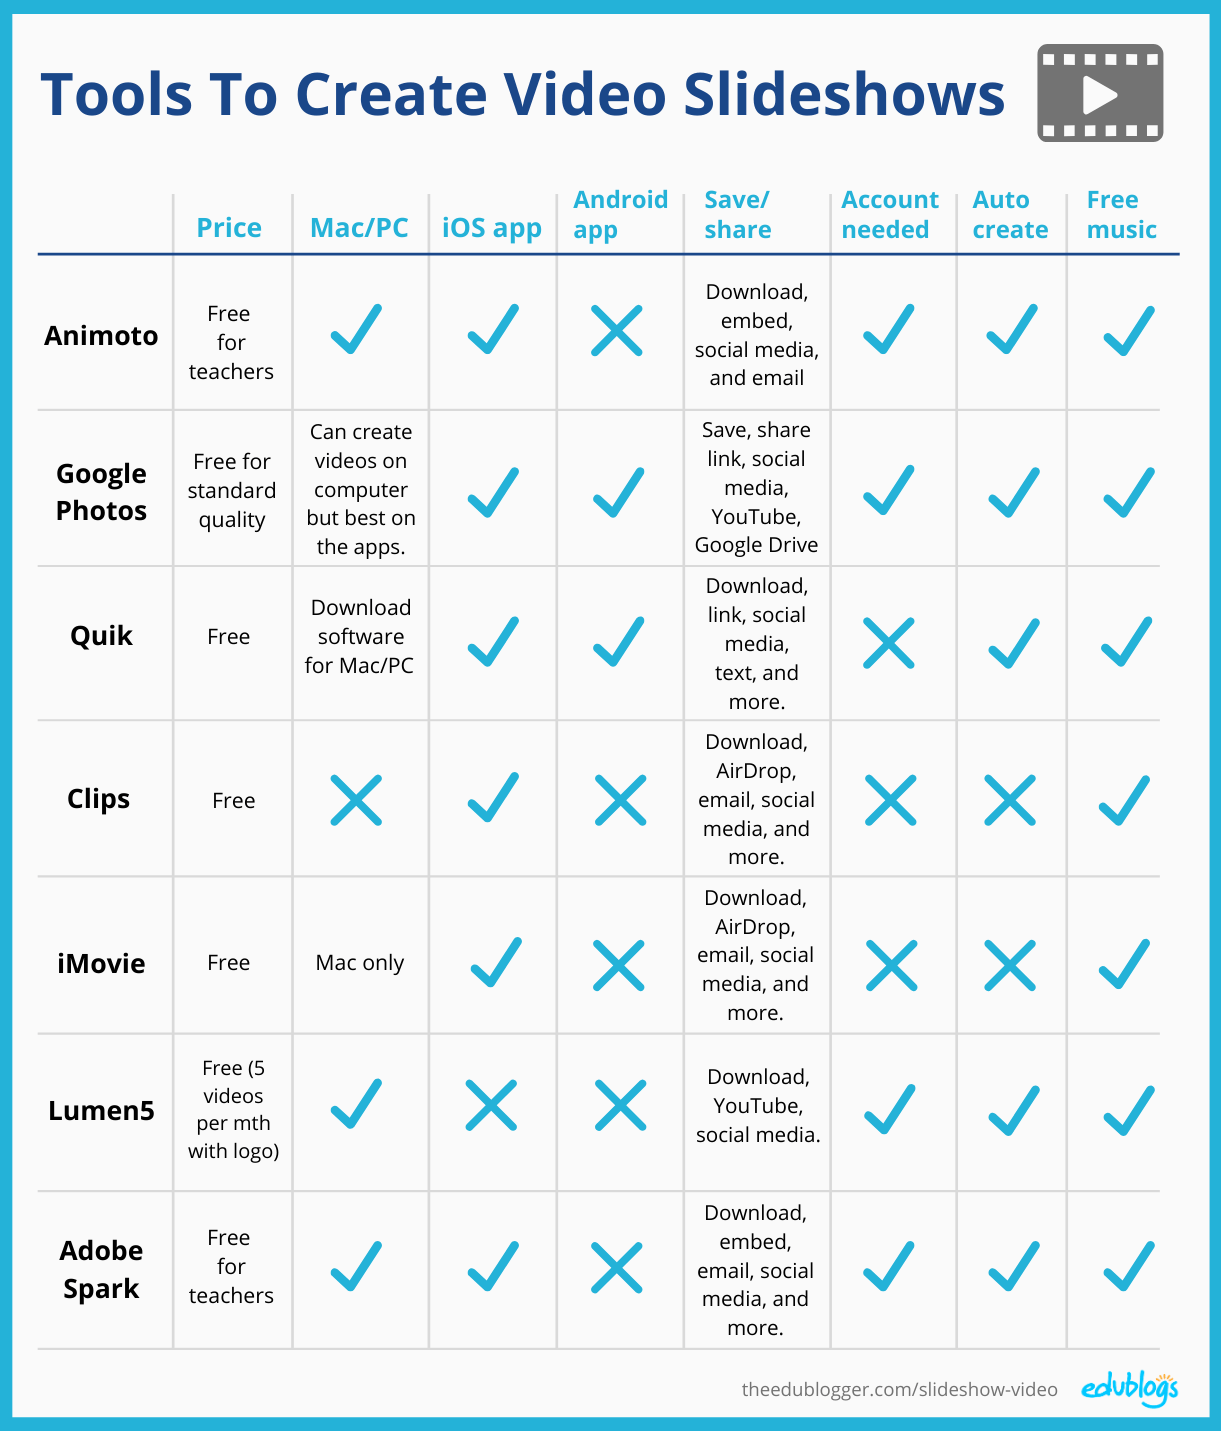
Comparison of free tools for creating slideshow style videos
Want to try a different free tool for making a slideshow style video or photo montage? I recently published a post on The Edublogger that goes through 7 of the best options.
Here’s a summary chart I made to compare the tools:
Best App for Making a Short Video on Your Phone or Tablet: Quik
URL: iOS app | Android app
Use on: Phone or tablet
Note: There is also a desktop app but you need to download software

Quik by GoPro is a free app I’ve been using for a few years for both personal and professional short videos. For example, on a plane ride back from a family holiday, I made a video using the app about our trip. It’s easy to use and effective.
Here’s why I recommend Quik if you want to create a short video:
- You can use it on your phone or tablet whether you’re an iOS or Android user.
- There are no in-app purchases (i.e. it’s really free).
- You select your photos and videos (up to 200), then the app puts them together “automagically” using your chosen theme. From there, you can edit the music and look of the video. Warning: I’m a sucker for tweaking so a “quick” project can often take longer than you anticipate but you may not be such a perfectionist!
- There are 26 inbuilt themes and 100+ options for free music.
- Sharing is easy — you can upload to social media, text the video to a friend, or just save it to your device.
Honorable mentions for apps to make quick videos on your phone: Adobe Spark Video or Splice
- Adobe Spark Video allows you to combine pictures, videos clips, icons, text, voice, and music to create compelling videos. You can make your videos on the web or via an iOS app. Tip: Make sure you’ve signed up for an Adobe Spark education account. This will give you free premium features.
- Splice is a free iOS app that has no in-app purchases. Unlike Quik, Splice doesn’t put your footage together “automagically” but if I want to make a video manually on my phone, this is often a go-to choice for me. You add your clips, trim them, add transitions, set your music and titles, and you’re good to go!
Best Tool for Video Conferencing: Zoom
URL: https://www.zoom.us
Use on: Web app | iOS app | Android app

Video conferencing has become a staple of online learning.
Despite some bad press about privacy, Zoom remains my favourite video conferencing tool. Like most video conferencing tools, it has screen sharing capabilities and can be used on computers or mobile devices.
Here’s why I recommend Zoom for video conferencing:
- It’s always free (the 40 minute limit has been lifted for educators during school closures but even with this limit, it’s a minor restriction).
- You can display up to 49 people on grid view depending on your device. This is a lot more than some other tools.
- The breakout rooms are super handy for small group discussions.
- It’s easy for others to join your Zoom call without having their own account — calls can be password protected too.
- You can record your conference to your computer (ensure you have permission from participants).
Worried about privacy? Zoom has released some best practices in this PDF.
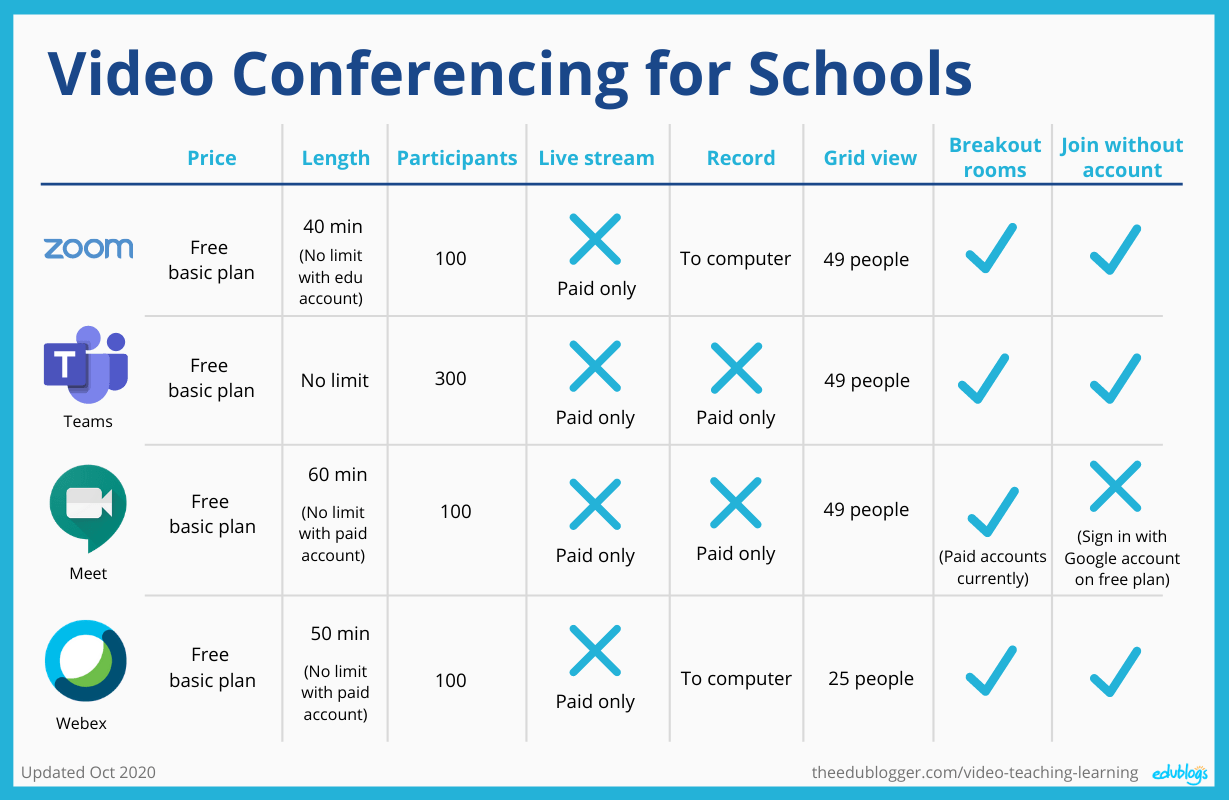
Comparison of free video conferencing tools for educators
Want to learn more about other video conferencing options? Here is a quick comparison of the free/education plans for Zoom, Microsoft Teams, Google Meet, and Webex Meetings. I made this for a post I wrote on The Edublogger about remote learning.
My Top Tips for Filming Better Videos on Your Phone
Video creation is a funny thing: on one hand, everyone can do it now; most people have a phone in their pocket. On the other hand, there are some really poorly created videos out there that could be so much better with just a few tweaks.
Here are my 5 top tips for filming a video on your mobile device based on some common mistakes I see time and time again:
📌 Download these tips as a poster in US Letter size.
📌 Download the tips in an A4 sized poster.
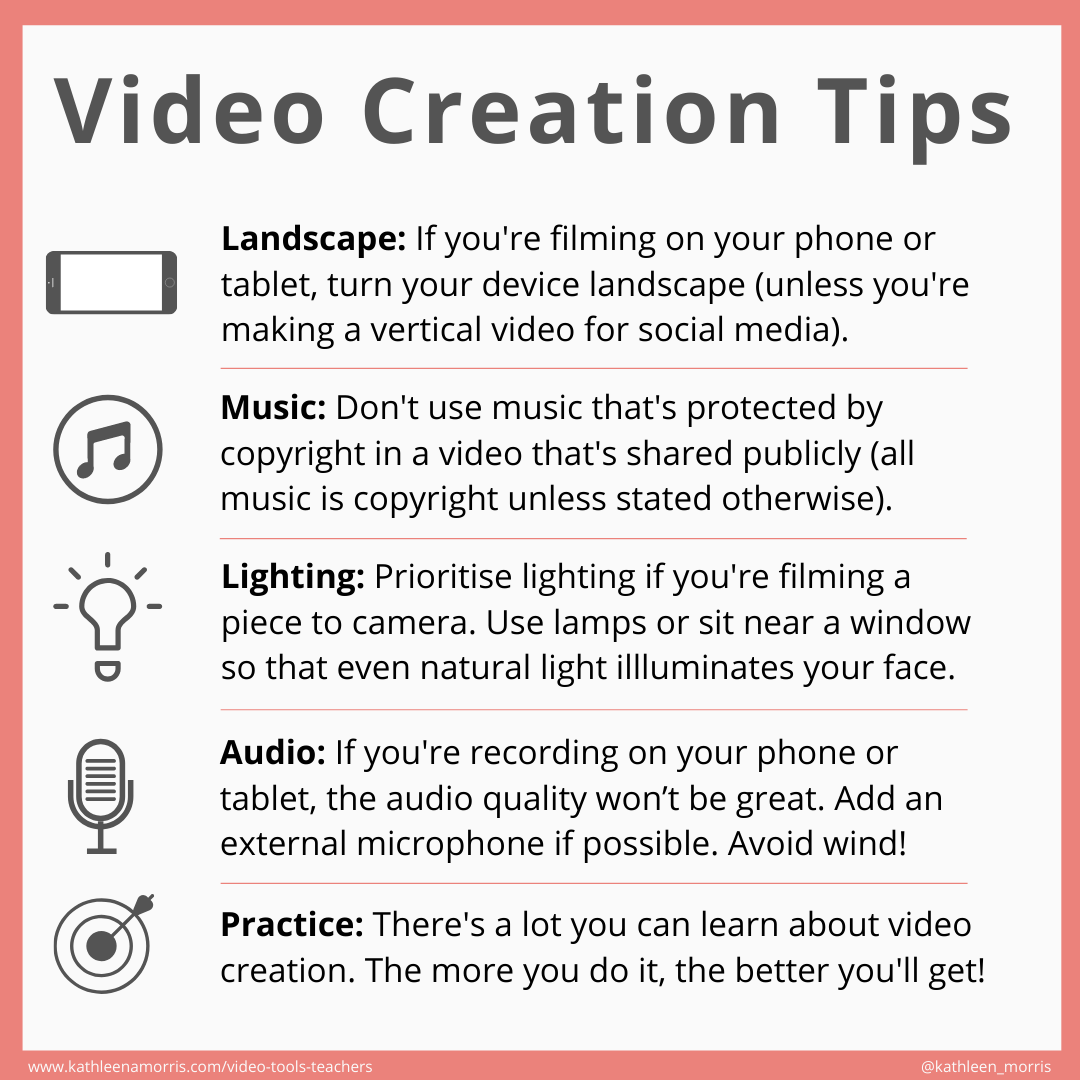
- Landscape: If you’re filming on your phone or tablet, turn it landscape (unless you’re making a vertical video for social media). If you want to know more about why your video should be horizontal, you might enjoy this funny video.
- Music: Don’t use music that’s protected by copyright (which is all music unless stated otherwise). Sadly, I have seen schools and teachers sharing their videos with copyright music online constantly lately. This is so disappointing as schools and teachers should be role models for their students.
- Lighting: Prioritise lighting if you’re filming a piece to camera. Your best bet is usually to sit near a window so that even natural light illuminates your face. The best way to choose your lighting is to simply walk around your house with your device while looking at your screen. You’ll be able to see the difference in lighting pretty quickly.
- Audio: Good quality audio is even more important than the visual quality of your video in my opinion. If you’re recording a piece to camera on your phone, the audio quality won’t be great. Add an external microphone if possible. Personally, I use the Boya lavalier lapel microphone. It’s under $30 and works great (no affiliations here!). If you use an iPhone/iPad, you’ll need the headphone jack adapter to plug in your mic. If you’re recording a screencast, use an external mic or headset if you can. Play around with this as when you get the audio formula right, it’ll greatly enhance the quality of your videos. Filming outdoors can be tricky too — wind will make your audio quality sound terrible!
- Practice: There is so much you can learn about video creation. The more you do it, the better you’ll get!
💡 Bonus tip! Wipe the lens on your phone or device before you hit record. It’ll make a difference!
Conclusion
I hope this summary of my favourite tools for creating videos in the classroom helps you wade through confusion and overwhelm.
There’s no denying that sometimes you have to invest a little bit of time into trying and playing around with different programs. You also need to consider whether you like making videos on a computer, like me, or if you’re happier using a mobile device.
Once you’ve tried out a few tools, you’re sure to settle on a favourite that you’ll use time and time again.
Do you have a favourite tool for creating or editing videos? What sort of videos do you like to create? If you have any tips or experiences, I’d love to hear about them in a comment. Scroll down to find the comment box.
You Might Also Enjoy
- 8 Ways Teachers And Schools Can Communicate With Parents
- 50 Mini-Lessons For Teaching Students Research Skills
- A Beginner’s Guide To Copyright And Creative Commons
Featured image by Jessica Lewis from Pexels
Thank you for this guide Kathleen – it’s very helpful. Disappointing that there is no good free movie editor for windows any more. I also used to find movie maker did the job quite well. At least now I know not to bother hunting for one!
Hi Michelle,
I’ve always been surprised that there isn’t something awesome that’s free for Windows. I’m disappointed they killed off Movie Maker too. I think it’d still be a popular choice if it was still updated! Oh well, we can only hope. Nice to hear from you! 🙂
Beecut was pretty intuitive. It does have a watermark for the free version.
Hi Rhonda,
Thanks for the recommendation! I’ll have to check that one out! 🙂
Helpful post. Thanks.
this was very informative hopefully a new movie maker that is free will come out soon